Sensacore Autosampler Project
My first dive into sheet metal and CNC manufacturing!
Disclaimer! Everything I show is approved by Sensacore!
I am permitted by the company to show photos/videos of the outer CAD and physical model shown in this portfolio page, and I can talk about many design decisions I have made. There are many internals inside the device that I have hidden and not shown to preserve the company’s wishes. I will not be showing any drawings I have done, and I will not discuss anything about proprietary components and chemical formulations. I will do my best to cover as much as possible. Hope you enjoy!
Finished build getting checked by my seniors!
Introduction
I was a mechanical engineering intern at Sensacore from August 2025 to January 2026. My primary duties involved making design modifications to the upcoming product: the Autosampler. I had to create a new acrylic lid design fitted with gas struts for an auto-opening mechanism, and had to redesign all the sheet metal parts for a wider chassis.
My Role
I served as the junior mechanical engineer to my 3 seniors, and I was put in charge of the sheet metal chassis redesign, acrylic lid redesign, and gas strut sourcing and procurement. I was to modify the CAD, create new drawings for each part, send the drawings to our suppliers, and follow up on payments from our finance department. I was also responsible for sourcing gas struts from suppliers in India and communicating with those vendors about the required specifications and purchase order requirements.
First prototype that I had to improve on.
Problem Statement
This is the first prototype that I had to build off of. It was very thin to conserve space and keep weight low, and the important pieces in the middle were finalized for injection molding. The problem areas I had to address were:
1 . Change the lid hinges to make the lid more sturdy and stable.
2. Redesign the look of the back support of the lid to make it stronger and more aesthetic
3. Add gas struts to the lid to create an auto-opening feature, where the user had to open the lid around 40 degrees, and then the struts would do the rest of the work to lift it.
4. Add quality of life features, like making parts to soften the landing of the lid on the metal chassis.

CAD Model Work
For 2 months, I was editing and improving the CAD for the device. This meant changing every single sheet metal part and also creating new ones that would increase the device's width by 40mm in total. Furthermore, I modified the lid to feature larger radii and thicker acrylic panels (5mm to 8mm) for a sleeker appearance. I redesigned the hinge assembly and back support piece of the device so now it is a big sheet metal support that is welded to the base frame. Lastly, I added functional gas struts that I found from a vendor , and configured the gas strut in the CAD after discussing with their representative about the specifications needed.
I was tasked with making a skeleton of the sheet metal first and then adding the actual device components inside a different assembly. The skeleton is used for making an instruction manual for the sheet metal fabrication facility, where I had to use configurations to create a book that details how every piece fits into the assembly so they can be welded together. I also had to create drawings for EVERY SINGLE SHEET METAL PART. The drawings were really tedious since they had to have dimensions for the flat pattern of the part and also the bends, so they usually required 4-5 different views with a lot of dimensions on it for lengths, bend angles, and more.
Full CAD assembly done! Every sheet metal part is now larger and wider, lid is changed, gas struts are added, and some internal parts are changed
Doing a spreadsheet analysis of the moment of the lid at each angle. When the red line is over the blue line, that means the gas strut is stronger than the lid’s gravitational force, so the lid will auto-open at that angle. I had to tweak the gas strut force and position to get a curve that I liked.
Test for gas struts with 70N. It is a little weak and accelerates a lot at the end, so those are problems that need to be fixed for the next iterations
Gas Strut Calculations and Sourcing
The gas struts were one of the toughest parts of the project. I first had to find the right length and placement for the gas struts in the assembly using online models, then calculate the forces needed to have the lid open automatically at 40 degrees, and finally place an order for prototypes from an official manufacturer.
I had to calculate the force required by doing a moment analysis, where I would find the moment forces of the gas strut and the gravitational forces of the lid for every single angle of the lid opening to figure out at what angle would the forces cancel eachother out (meaning when would the gas strut forces overcome the gravitational forces and thus start automatically opening the lid). I found an optimal force of 70N, but I asked my superiors to get a range of gas struts from 60N to 80N, just in case the calculations are oversimplified. Over the course of a few months, I had to discuss and organize a prototype batch and then a full purchase order for 200 gas struts with the Suspa representatives.
Sheet Metal and CNC Parts Arrives
After making all the CAD modifications, creating 40 drawings and dxf files, and even making an assembly instruction document, the chassis was finally created and sent to the company! It was amazing to see the product in person after all the work done in the background. These are the moments that make me feel proud to have chosen this field.
The frame was all welded and powder coated in a signal white paint tone. There were a few areas in the build that I wanted to have changed, such as some parts having bead welds instead of full straight welds in some locations, but there were no detrimental errors.
I also sent out step files and drawings for some CNC parts that would give a good cushion for the lid to sit on when the device is closed. The cnc strips are made of aluminum and will be anodized white in the future to blend in with the chassis. There are 5 pieces in total.
Chassis picture 2! This time with a 3d printed model of inner part.
some individual components sent separately!
Picture 1 of the CNC sponge holders for the lid resting point. This one is made of stainless steel
The sponge holders are screwed into the prototype to check the fit.
Picture 2 of the CNC sponge holders for the lid resting point, this time it is Aluminum 6061.
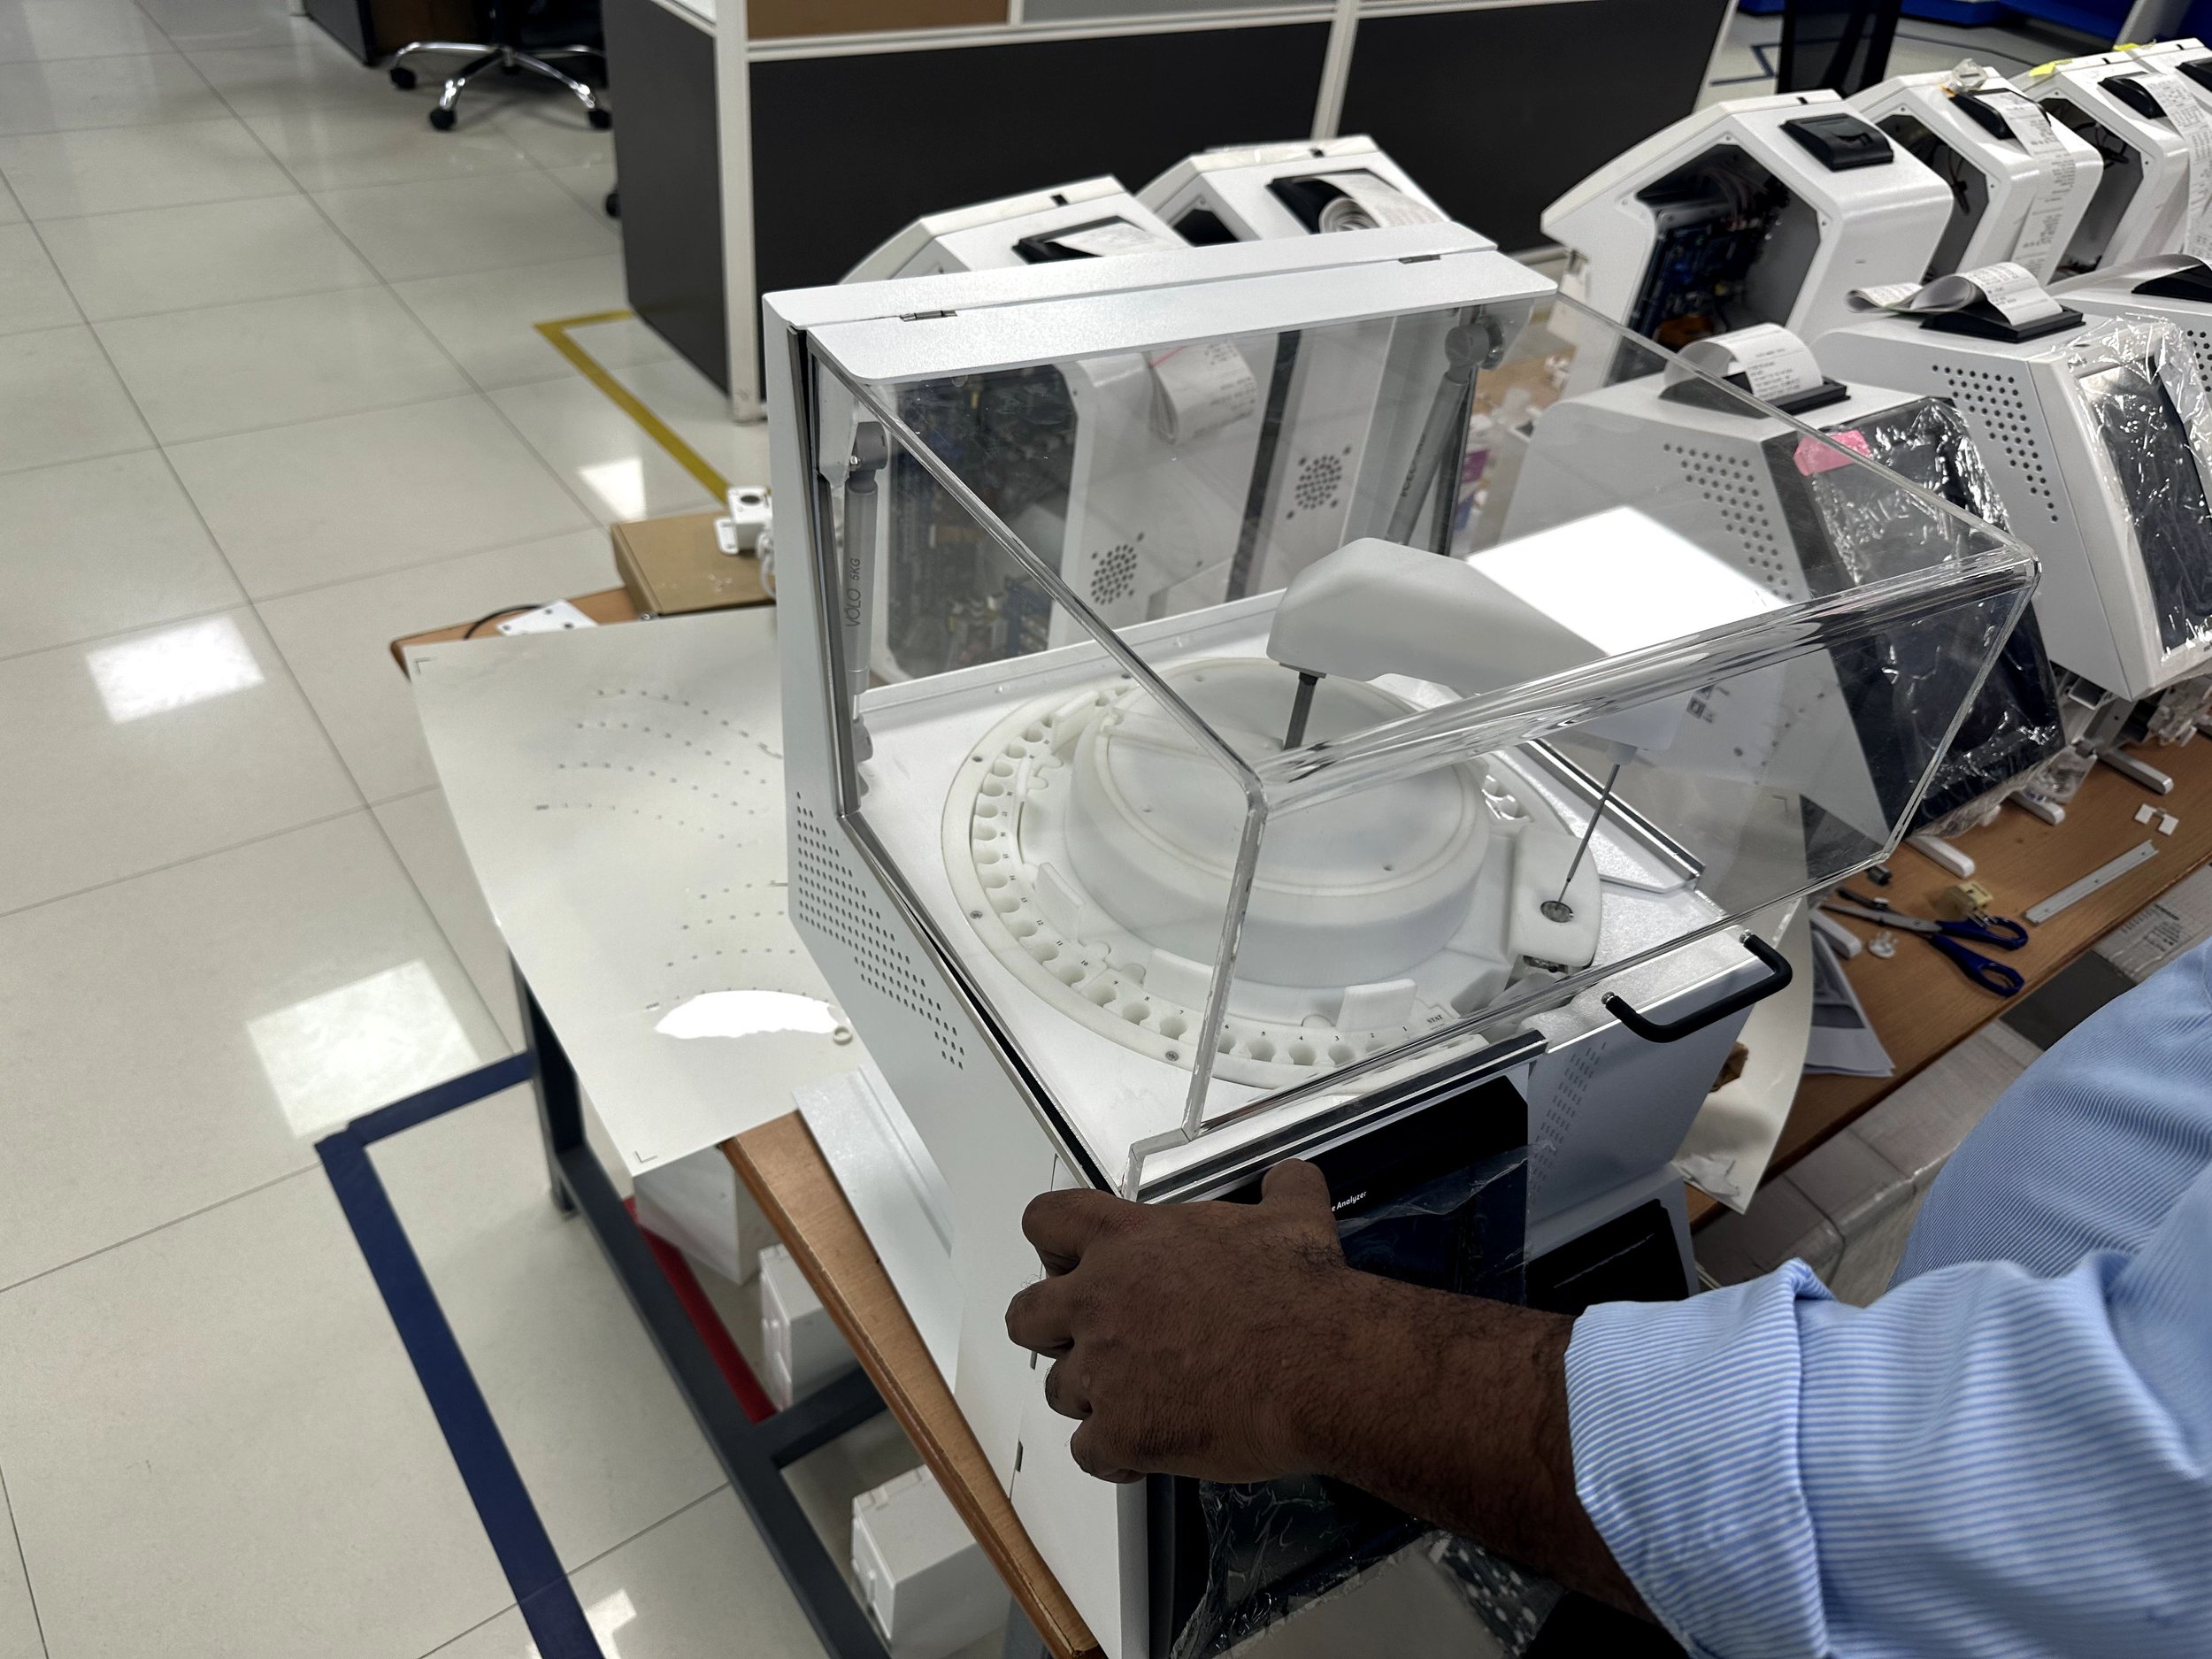
Final Build and Reflection!
My coworkers were able to assemble all the necessary internal and external components for the build and there were very few issues! I am proud with the finished prototype, it looked beautiful and was functional! I was unable to stay for the Suspa Gas struts to arrive, so we used standard gas struts for the demonstrations. For future iterations, the team wanted to experiment with wider sponge mounts and minor changes to the hinges and gas strut sheet metal attachments. Nonetheless, it was a success!
I learned and observed the entire sheet metal process, from CAD modeling to vendor discussions to seeing the manufacturing processes in person. It was an amazing educational experience, and I am so happy that I can now add sheet metal DFM to my arsenal. Furthermore, I was able to utilize CNC manufacturing and have in-depth discussions with machinists on different machining capabilities and DFM principles for the best results during this project. I also had to learn how to discuss product specifications and organize purchase orders with a supplier. Lastly, I learned how to operate in a work environment and collaborate with my coworkers to get a task done. Outside of work, I had to adjust to life in India, and this experience pushed me to grow and adapt to a completely new lifestyle.
I am very thankful to my coworkers and superiors for guiding me and supporting me through this whole process. They have been understanding but also made sure I was involved, grew as an engineer.
Finished build getting checked by my senior!
Finished build viewed from the back!
Video of my testing the angle that the lid stays put from the gas strut